
This week, it was hot here in California. According to the weather forecast, it reached up to the mid-90 F… Oh, I couldn’t stand staying under the sun, so I’ve dedicated a lot of my time to do another tutorial here.
Since it’s getting hot recently, I put my hair up in a ponytail almost everyday. So, I assume that there are lots of girls who need this hair bow now!! I’m trying to put more effort on making it easier for everyone to understand. I hope you will like it! Well, let’s get started 🙂

◆Materials◆
Worsted Weight Yarn (Medium 4)
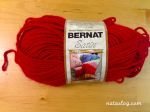
- Red: BERNAT Satin (CRIMSON)
Size G(4mm) Crochet Hook
Yarn Needle
(Safety pin)
◆Size◆
If you follow the instruction below, it will be around 4″ width. If you want something bigger, you can increase a number of ch in the step 1 and increase the number os sc in the following rows.
◆Pattern◆
*** It’s easier to start every row with 1 ch and to end each row with a slip stitch since you will see where you started the row which you are working on.
*** I like the seamless surface, so in this tutorial, I take this method. You just have to keep going, but it may be difficult to see where you started the row (especially when you are working on even rows). So, it’s better to use a safety pin to mark the first stitch of each row.
◇◆◇◆◇◆◇◆◇◆
- ch 9
- Ch 8 as a foundation of the oblong, and the extra ch 1
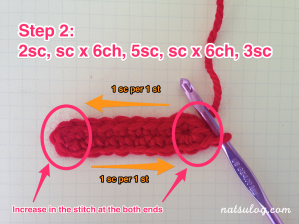
- You will treat “the 2nd ch (from the hook)” and “the last ch” as “the increasing zone”
- You will just make 1 sc for the middle 6 st

- 2 sc in the 2nd st from the hook, 1 sc for the next 6 st, 5 sc in the next st, 1 sc for the next 6 st, 3 sc in the next st (same st with the st you made 2 sc at the beginning) (22 sc)
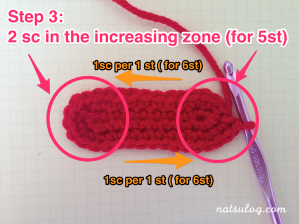
- 2 sc around in the increasing zone. (2 sc for the 1st 2 st, 1 sc for the next 6 st, 2 sc in the next 5 st, 1 sc for the following 6 st, 2 sc for the next 3 st) (32 sc)
- 2 sc, 1 sc around in the increasing zone. ((2 sc, 1 sc) twice, 1 sc for the next 6 st, (2 sc, 1 sc) 5 times, 1 sc for the following 6 st,(2 sc, 1 sc) 3 times) (42 sc)

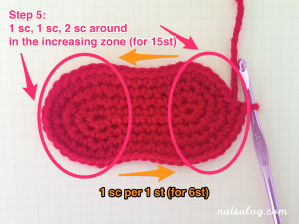
- 1 sc, 1 sc, 2 sc around in the increasing zone. ((1 sc, 1 sc, 2 sc) twice, 1 sc for the next 6 st, (1 sc, 1 sc, 2 sc) 5 times, 1 sc for the following 6 st, (1 sc, 1 sc, 2 sc) 3 times) (52 sc)
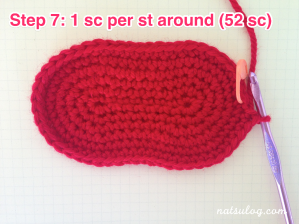
- 1 sc around (52 sc)

- 1 sc around (52 sc)
- 1 slip stitch (sl-st) around (52 sl-st)

- Cut the yarn and bring the yarn to the very center of the backside with a yarn needle

- Shape “M”, leaving the center and the both ends to low, and making somewhere in the middle (around Row 4) high. Sew a little bit with the yarn to keep the form.

- Here, we’ll work on the center ring. ch 14 and make a loop by joining to the 1st st with sl-st

- 2nd row: sc around (14 sc)

- 3rd row: sc around (14 sc)

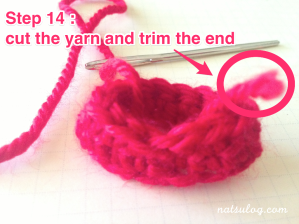
- Cut the yarn, leaving some length (enough with 10″). Trim the both ends with a yarn needle. Leave the long end yarn.
- I recommend to tie those two strings together, just in case, before cutting off the short yarn (shown in the picture).
- Put the oblong (you made at Step 10) through into the center ring.

- Insert a string of elastic hair band into the center ring and bind it up.

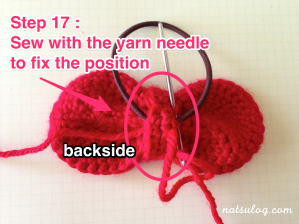
- Sew the backside of the bow with the yarn needle. At this point, it’s better to hide the joint point of the hair band.
- Trim the rest of the yarn, and it’s DONE!!!

◇◆◇◆◇◆◇◆◇◆
If you are with me till here, thank you so much for your patience!! It was challenging for me to explain the flow with lots of photos, but I hope many people will find it easier to understand this tutorial and eventually enjoy making a bow for the summer!!
You can also use the bow as a decoration of your bags, clothes or hats!! Please enjoy customizing it as you like!!
I will always be happy to see your works ♡ Please feel free to leave comments or questions 🙂
